Thursday, January 31, 2013
Midnight Desire - PTU

Supplies Needed:
Tube of choice: Im using the wonderful art work of Zindy Nielsen
You can purchase her tubes at Zindy Zone HERE
PTU Scrap Kit by Mizteeque from called "Midnight Desire"
You an purchase this awesome kit HERE
Template #9 from Flaminsal of Fired by Flamin HERE
Mask of choice
Don't forget to leave a thank you when downloading
Xero Porcelain
Open template - Shift D to duplicate then close out original
Delete copyright, 2 hearts & wordart
paste a paper of choice from the kit - I used paper4
selection invert delete
select none delete the original
paste a paper of choice from the kit - I used paper13
selection invert delete
select none delete the original
paste a paper of choice from the kit - I used paper7
selection invert delete
select none delete the original
paste a paper of choice from the kit - I used paper9
selection invert delete
select none delete the original
paste a paper of choice from the kit - I used paper10
selection invert delete
select none delete the original
Apply Xero Porcelain
paste a paper of choice from the kit - I used paper1
selection invert delete
select none delete the original
I used the following:
Element 6
Element 7
Element 8
Element 10
Element 26
Element 31
Element 37
Element 40
Element 47
Element 50
Merge your layers
Add mask of choice
Add the Copyright and your License Number for the tube
Resize to your liking and save as PNG
This tutorial was created on January 31,2013 by Rhonda
Any resemblance to another Tag or Tutorial is purely coincidental


Tuesday, January 29, 2013
Blue Valentine - PTU

Supplies Needed:
Tube of choice: Im using the wonderful art work of Zlata_M
You must obtain a license to use her art at Pics for Design HERE
PTU Scrap Kit by Laura from Tiny Turtle Design called "Blue Dreams"
You an purchase this awesome kit at SATC HERE
Mask of choice
Xero Radiance
Open blank canvas 700x700
Open element 74 - resixe and place in center of canvas
Place your main tube in the center
Add Xero Radiance
Grab the selection tool and draw a rectangle around the frame
Open paper 20 and place as a new layer
selections invert delete
move paper under frame
Place close up of tube in the outer frames
Apply Xero Radiance again
Now lets add our elements around the tube
I used:
Element 76
Element 77
Element 79
Element 86
Element 87
Element 96
Element 99
Add the Copyright and your License Number for the tube
Resize to your liking and save as PNG
This tutorial was created on January 29,2013 by Rhonda
Any resemblance to another Tag or Tutorial is purely coincidental
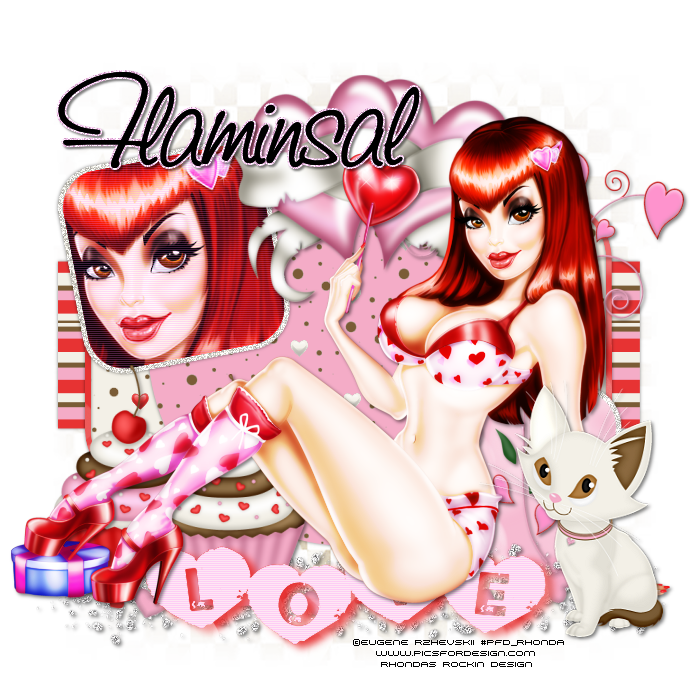
Love - FTU
Supplies Needed:
Tube of choice: Im using the wonderful art work of Eugene Rzhevskii
You can purchase this tube at Pics for Design HERE
FTU Scrap Kit by Melissa HERE
Mask of choice
Don't forget to leave a thank you when downloading
Plugins Used:
Xero Radiance
Open template - Shift D to duplicate then close out original
Canvas size 700x700
Delete the copyright,hearts & dotted circle
I used a pink color on the word then used a blind effect
I then used a red color for the background
Merge the 2 together and dropshadow
paste a paper of choice from the kit - I used paper11
selection invert delete
select none delete the original
paste a paper of choice from the kit - I used paper6
selection invert delete
select none delete the original
paste a paper of choice from the kit - I used paper2
selection invert delete
select none delete the original
paste a paper of choice from the kit - I used paper3
selection invert delete
select none delete the original
Apply Xero Radiance with default settings
Add blinds effect
paste a paper of choice from the kit - I used paper4
selection invert delete
select none delete the original
Add noise 45% uniform
Xero radiance with settings of choice
Open raster 29 - resize 90% - position to the right beside wordart (I mirrored mine)
Open raster 21 - position on bottom left of tag behind wordart
Open raster 20 - position on bottom left of tag beside other cupcake
Open raster 16 - position in center of tag at the top
Open raster 5 - position to right of tag behind tube and pink hearts
Add mask
Add the Copyright and your License Number for the tube
Resize to your liking and save as PNG
This tutorial was created on January 22,2013 by Rhonda
Any resemblance to another Tag or Tutorial is purely coincidental
Subscribe to:
Posts (Atom)
My Blinkie

My Licenses

