Monday, November 26, 2012
Christmas Train - PTU

Supplies Needed:
Tube of choice: Im using the wonderful art work of Alex Prihodko
Which you must obtain a license to use at Pic for Design HERE
PTU Scrap Kit by Jen from Sweet Temptations called "No Peekin"
You an purchase this awesome kit HERE
Template #106 by Rosey from Rosey's Place HERE
Mask of choice
Don't forget to leave a thank you when downloading
Plugins Used:
Xero Radiance
Open template - Shift D to duplicate then close out original
Canvas size 700x700
delete copyright,white&purple right circle
paste a paper of choice from the kit - I used paper10
selection invert delete
select none delete the original
paste a paper of choice from the kit - I used paper1
selection invert delete
select none delete the original
paste a paper of choice from the kit - I used paper2
selection invert delete
select none delete the original
paste a paper of choice from the kit - I used paper5
selection invert delete
select none delete the original
paste a paper of choice from the kit - I used paper2
selection invert delete
select none delete the original
paste a paper of choice from the kit - I used paper8
selection invert delete
select none delete the original
Xero Radiance with settings of choice
I used the following:
Bells
Candle1
Candycanes
Cardinal
Gifts
Gifts1
House
Train
Add mask of choice
Add the Copyright and your License Number for the tube
Resize to your liking and save as PNG
This tutorial was created on November 26, 2012 by Rhonda
Any resemblance to another Tag or Tutorial is purely coincidental

Sunday, November 25, 2012
Dear Santa - PTU

Supplies Needed:
Tube of choice: Im using the wonderful art work of Pinup Toons
You can purchase these tubes at CDO HERE
PTU Scrap Kit by Jen from Sweets Temptations called "All Spruced Up"
You an purchase this awesome kit HERE
Template #165 from Punky Butts HERE
Mask of choice
Don't forget to leave a thank you when downloading
Xero Radiance
Open template - Shift D to duplicate then close out original
Delete copyright, all stars layers, layers 9,10,11&12
paste a paper of choice from the kit - I used paper8
selection invert delete
select none delete the original
paste a paper of choice from the kit - I used paper5
selection invert delete
select none delete the original
paste a paper of choice from the kit - I used paper10
selection invert delete
select none delete the original
paste a paper of choice from the kit - I used paper6
selection invert delete
select none delete the original
paste a paper of choice from the kit - I used paper3
selection invert delete
select none delete the original
apply Xero radiance with settings of choice
I used the following:
Candycane 1
Gift
Letter to Santa
Lights
Ornament 3&5
Pup
Puppy N Box
Santa Box
Tree 1
Add mask of choice
Add the Copyright and your License Number for the tube
Resize to your liking and save as PNG
This tutorial was created on November 25,2012 by Rhonda
Any resemblance to another Tag or Tutorial is purely coincidental
Rock This Christmas - PTU

Supplies Needed:
Tube of choice: Im using the wonderful art work of Barbara Jensen
I received this tube as a Christmas gift
You can purchase her work at her own store HERE
PTU Scrap Kit by Nicky from Inzpired Creationz called "Dazzle Me"
You an purchase this awesome kit from SATC HERE
Template 131 by Millie from Millie's PSP Madness
You can get this HERE
Don't forget to leave a thank you when downloading
Plugins Used:
Xero Radiance
Open template - Shift D to duplicate then close out original
Delete copyright
paste a paper of choice from the kit - I used paper8
selection invert delete
select none delete the original
paste a paper of choice from the kit - I used paper7
selection invert delete
select none delete the original
paste a paper of choice from the kit - I used paper1
selection invert delete
select none delete the original
add noise
paste a paper of choice from the kit - I used paper5
selection invert delete
select none delete the original
paste a paper of choice from the kit - I used paper6
selection invert delete
select none delete the original
paste a paper of choice from the kit - I used paper1
selection invert delete
select none delete the original
add noise
paste a paper of choice from the kit - I used paper12
selection invert delete
select none delete the original
paste a paper of choice from the kit - I used paper4
selection invert delete
select none delete the original
paste a paper of choice from the kit - I used paper15
selection invert delete
select none delete the original
paste a paper of choice from the kit - I used paper9
selection invert delete
select none delete the original
paste a paper of choice from the kit - I used paper6
selection invert delete
select none delete the original
Xero Radiance with settings of choice
Candy Cane 1
Card
Champs & Decor
Christmas Tree 2
Frame Border 1
Gift 1&2
Gifts 1
Holly
Kitty
Ornaments 1
Poinestta
Scatterd Snowflakes 1
Add the Copyright and your License Number for the tube
Resize to your liking and save as PNG
This tutorial was created on November 25,2012 by Rhonda
Any resemblance to another Tag or Tutorial is purely coincidental
North Pole Cutie - FTU

Supplies Needed:
Tube of choice: Im using the wonderful art work of Zlata_M
You can purchase her tubes at PFD HERE
FTU Scrap Kit by Vesta called "Pink Ice Xmas" HERE
Mask of choice
Don't forget to leave a thank you when downloading
Plugins Used:
Xero Radiance
Open cluster frame 1 - paste as a new layer
Grab the freehand tool and draw around 1 frame at a time
Open closeup tube and place inside each frame
Selections invert delete
Apply Xero Radiance with settings of choice
Open element 2 - resize - place at top left of frame
Open element 29 - resize - place at bottom left of frame
Duplicate this element and move behind the frame
Grab the eraser tool and erase all parts showing on top of frame
You want the candle to show behind the frame
Open element 30 - resize and place to bottom right of frame
Open element 37 - resize - place in front of frame to left
Open element 31 - resize - place beside element 37 more to the right
Place your main tube to right of frame
Apply Xero radiance with settings of choice
Merge your layers
Open paper 10 and apply mask of choice
Merge group
Open sparkles 2 - apply on top of mask
Add the Copyright and your License Number for the tube
Resize to your liking and save as PNG
This tutorial was created on November 17,2012 by Rhonda
Any resemblance to another Tag or Tutorial is purely coincidental
Thursday, November 22, 2012
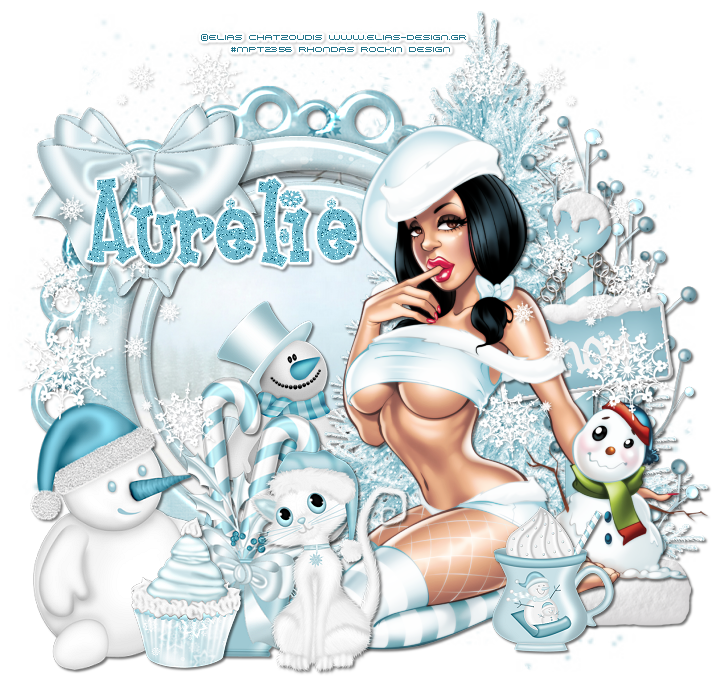
Time for Snow - PTU
Supplies Needed:
Tube of choice: Im using the wonderful art work of Elias Chatzoudis
This tube was purchased at MPT which has now closed
You can now find Elias's work at his own store HERE
PTU Scrap Kit By Aurelie from Pink Candy Designs called "Snowflake"
You an find this awesome kit HERE
Mask of choice
Plugins Used:
Xero Radiance
Open a blank image 715x685
resize by 90%
Open frame 2 from kit and place on top of frame 1
resize this frame by 80%
Grab the magik wand and click inside frame 1
Select modify expand by 6
Open paper 11 from kit and place as a new layer
selections invert - delete
move paper under frame
Dropshadow the elements then merge
Apply Xero Radiance with settings of choice
I used the following:
Berries
Bow
Cupcake
Kitten
Mug
Sign 2
Snowman 1&2
Snowflakes
Tree 2
Open mask and apply to tag
Add the Copyright and your License Number for the tube
Resize to your liking and save as PNG
This tutorial was created on November 22,2012 by Rhonda
Any resemblance to another Tag or Tutorial is purely coincidental
Monday, November 19, 2012
Gift for Me - PTU

Supplies Needed:
Tube of choice: Im using the wonderful art work of Gene Gonzales
I'm not sure where or if he is selling at this time
This tube was bought at CILM which is now closed
PTU Scrap Kit by Jen from Sweet Temptations - It is her 12 Days of Christmas in 2009
You an purchase this awesome kit HERE
Template #1 by Cupcake Sprinkles from the Template Bundle Pack
You can get this HERE
Templates are located on the right hand side of page
Mask of choice
Don't forget to leave a thank you when downloading
Plugins Used:
Xero Radiance
Photo Effex Scanlines
Open template - Shift D to duplicate then close out original
Resize 130% all layers checked
Canvas size 700x675
delete copyright & staples
paste a paper of choice from the kit - I used paper34
selection invert delete
select none delete the original
add noise
paste a paper of choice from the kit - I used paper18
selection invert delete
select none delete the original
paste a paper of choice from the kit - I used paper30
selection invert delete
select none delete the original
paste a paper of choice from the kit - I used paper5
selection invert delete
select none delete the original
paste a paper of choice from the kit - I used paper36
selection invert delete
select none delete the original
Xero Radiance with settings of choice
I used the following:
Card 12
Card 2
Bear 12
Candle 5
Sack 1
Tree 11
Gift 5
Gift 6
Holly Bell 2
Sleigh 1
Add mask of choice
Add the Copyright and your License Number for the tube
Resize to your liking and save as PNG
This tutorial was created on November 18, 2012 by Rhonda
Any resemblance to another Tag or Tutorial is purely coincidental
Sunday, November 18, 2012
Winter Thoughts - PTU

Supplies Needed:
Tube of choice: Im using the wonderful art work of Jose Cano
You can purchase his work at SATC HERE
PTU Scrap Kit by Nicky from Inzpired Creationz called "Pinkish Winter"
You an purchase this awesome kit from SATC HERE
Christmas Template #18 by Leah HERE
Don't forget to leave a thank you when downloading
Plugins Used:
Xero Radiance
Xero Porcelin
Open template - Shift D to duplicate then close out original
Delete copyright,all wordart,square 1,square 1 back & rect 2
paste a paper of choice from the kit - I used paper6
selection invert delete
select none delete the original
paste a paper of choice from the kit - I used paper4
selection invert delete
select none delete the original
paste a paper of choice from the kit - I used paper8
selection invert delete
select none delete the original
paste a paper of choice from the kit - I used paper3
selection invert delete
select none delete the original
paste a paper of choice from the kit - I used paper2
selection invert delete
select none delete the original
paste a paper of choice from the kit - I used paper10
selection invert delete
select none delete the original
add noise
paste a paper of choice from the kit - I used paper3
selection invert delete
select none delete the original
Xero Radiance with settings of choice
Xero Porcelin with settings of choice
I used the following:
Baubles
Bells
Bird
candles
Christmas Tree
Cocoa
Package
Packages 1&2
Reindeer 1
Ribbon 1
Sparkles 2
Add the Copyright and your License Number for the tube
Resize to your liking and save as PNG
This tutorial was created on November 18,2012 by Rhonda
Any resemblance to another Tag or Tutorial is purely coincidental
What's Cooking - PTU

Supplies Needed:
Tube of choice: Im using the wonderful art work of Elias Chatzoudis
You can purchase his work at his store HERE
PTU Scrap Kit by Jen from Sweets Temptations called "Pumpkin Spice"
You an purchase this awesome kit HERE
Thanksgiving Template #111 by Leah
You can get this HERE
Mask of choice
Don't forget to leave a thank you when downloading
Xero Radiance
Filters Unlimited
Open template - Shift D to duplicate then close out original
Resize 110% all layers
Canvas size 700x675
delete top 3 layers
add noise to all the frame layers
paste a paper of choice from the kit - I used paper10
selection invert delete
select none delete the original
paste a paper of choice from the kit - I used paper7
selection invert delete
select none delete the original
add a brown color
apply Filters Unlimited Fine Canvas
select none delete the original
paste a paper of choice from the kit - I used paper2
selection invert delete
select none delete the original
paste a paper of choice from the kit - I used paper9
selection invert delete
select none delete the original
paste a paper of choice from the kit - I used paper6
selection invert delete
select none delete the original
paste a paper of choice from the kit - I used paper1
selection invert delete
select none delete the original
Xero radiance with settings of choice
I used the following:
Bow
Branch
Cake
Candle
Cup
Cupcake 1&3
Jar
Pies
Turkey
Apply mask
Add the Copyright and your License Number for the tube
Resize to your liking and save as PNG
This tutorial was created on November 18,2012 by Rhonda
Any resemblance to another Tag or Tutorial is purely coincidental
Rockitudeness - PTU

Supplies Needed:
Tube of choice: Im using the wonderful art work of Elias Chatzoudis
Which you must obtain a license to use at his store HERE
Scrap Kit By Aurelie from Pink Candy Designs called "Best of Rock"
You an purchase this awesome kit HERE
Template #375 by Missy from Divine Intentionz
You can get this HERE
Don't forget to leave a thank you when downloading
Plugins Used:
Xero Radiance
Eyecandy Gradient Glow
Open template - Shift D to duplicate then close out original
Canvas 710x685
deleted copyright
paste a paper of choice from the kit - I used paper13
selection invert delete
select none delete the original
paste a paper of choice from the kit - I used paper10
selection invert delete
select none delete the original
paste a paper of choice from the kit - I used paper2
selection invert delete
select none delete the original
Add Eyecandy Gradient Glow
paste a paper of choice from the kit - I used paper15
selection invert delete
select none delete the original
paste a paper of choice from the kit - I used paper7
selection invert delete
select none delete the original
paste a paper of choice from the kit - I used paper4
selection invert delete
select none delete the original
Add noise with settings of choice
paste a paper of choice from the kit - I used paper10
selection invert delete
select none delete the original
paste a paper of choice from the kit - I used paper12
selection invert delete
select none delete the original
Add noise with settings of choice
Xero Radiance with settings of choice
I used the following:
Cupcake 2
Guitar
Ipod 1&2
Lollipop 2
Music Notes
Sparkles
Add the Copyright and your License Number for the tube
Resize to your liking and save as PNG
This tutorial was created on November 18, 2012 by Rhonda
Any resemblance to another Tag or Tutorial is purely coincidental
Inspire Me - FTU

Supplies Needed:
Tube of choice: Im using the wonderful art work of Elias Chatzoudis
This tube was purchased at MPT which has now closed
You can purchase his tubes at his own store HERE
FTU kit by Sarah HERE
Please leave some love when you download ..A little thanks goes a long way
Xero Radiance
Xero Porcelin
Eyecandy Gradient Glow
Open blank canvas 700x700
Open frame 3 from it and place as a new layer
Move frame slightly to the left
Grab the magic wand and click inside frame
Selections modify expand by 10
Open paper 8 - move paper down where the aqua & pink are showing
Selections invert delete
Place closeup of tube inside the frame
Apply Xero Radiance with settings of choice
Apply Xero Porcelin with default settings
Change the blend mode to Luminance on tube layer
Open frame 1 - resize 90% - place behind frame 3
Open bow 1 and place at bottom of frame
Open butterfly - image mirror - resize 62% & rotate a litle to the left
Place butterfly to top left of frame
Place your main tube to the right of frame
Apply Xero Radiance with settings of choice
Open wordart & place at bottom of tag
Apply Eyecandy gradient glow to wordart
Merge your layers
Open print 1 and apply under tag
Duplicate - mirror and move down
Do this 2 more times till you have 4 layers
Merge layers again
Place your name where you like it
Add the Copyright and your License Number for the tube
Resize to your liking and save as PNG
This tutorial was created on November 8,2012 by Rhonda
Any resemblance to another Tag or Tutorial is purely coincidental
Saturday, November 17, 2012
Postcard of Memories - FTU

Supplies Needed:
Tube of choice: Im using the wonderful art work of Jennifer Janesko
This tube was purchased at CILM which has now closed
You can purchase her tubes at CDO HERE
FTU kit by Aimee Harrison HERE
Wordart HERE
Please leave some love when you download these goodies
Xero Radiance
Open blank canvas 700x700
Open frame 3 and place as a new layer
Grab the selection tool and make a rectangle around the frame
Open paper 1 - resize 20% and place as a new layer
Selections invert delete
Move paper under frame
Open splat - resize and place on top of paper
Layers duplicate - mirror
Other elements I used are:
Flower 1&2
Heart
Postcard
Watch
Apply Xero Radiance with settings of choice
Place wordart where you desire
Merge layers
Place your name where you like it
Add the Copyright and your License Number for the tube
Resize to your liking and save as PNG
This tutorial was created on November 16,2012 by Rhonda
Any resemblance to another Tag or Tutorial is purely coincidental
Sunday, November 11, 2012
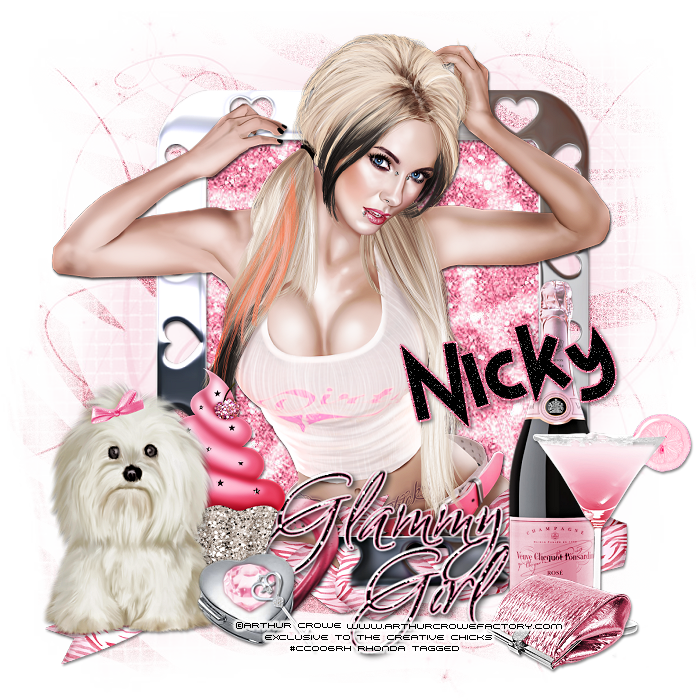
CC Galmmy Girl - PTU
Supplies Needed:
Tube of choice: Im using the wonderful art work of Arthur Crowe
This tube is an exclusive to The Creative Chicks Forum
You can find Crowe's awesome work HERE
PTU Scrapkit by Nicky from Inzpired Creationz called "Glammy Girl"
You can purchase this kit HERE
Mask #7 by Millie from Millie's PSp Madness HERE
Plugins Used:
Xero Radiance
This is a very quick and easy tutorial
Open a blank image 700x700
Open frame 4 from kit and place as a new layer
Grab the freehand selection tool and draw around frame
Paste paper 6 selections invert delete
Move paper under frame
Open tube and place inside frame
Apply Xero Radiance with settings of choice
Now lets add our elements
I used:
Box & Key
Champagne
Clutch
Cocktail 1
Cupcake 2
Doggy 1
Ribbon 3
Open paper 2 and apply mask
Add the Copyright and your License Number for the tube
Resize to your liking and save as PNG
This tutorial was created on November 11,2012 by Rhonda
Any resemblance to another Tag or Tutorial is purely coincidental
Edgy Rocker - FTU

Supplies Needed:
Tube of choice: Im using the wonderful art work of Kiwifire Storm
Which you must obtain a license to use at The PSP Project HERE
FTU Scrap Kit by Aurelie from Pink Candy Design called "Edgy Rocker"
You can download this awesome kit HERE
Template by Annaica from Annaica's Place
You can get this HERE
Don't forget to leave a thank you when downloading
Plugins Used:
Xero Radiance
Open template - Shift D to duplicate then close out original
Canvas size 709x650
delete the top 5 layers
paste a paper of choice from the kit - I used paper14
selection invert delete
select none delete the original
paste a paper of choice from the kit - I used paper4
selection invert delete
select none delete the original
add noise with settings of choice
paste a paper of choice from the kit - I used paper2
selection invert delete
select none delete the original
add Xero Fritillary with settings of choice
paste a paper of choice from the kit - I used paper6
selection invert delete
select none delete the original
paste a paper of choice from the kit - I used paper4
selection invert delete
select none delete the original
paste a paper of choice from the kit - I used paper7
selection invert delete
select none delete the original
paste a paper of choice from the kit - I used paper1
selection invert delete
select none delete the original
paste a paper of choice from the kit - I used paper3
selection invert delete
select none delete the original
add noise with settings of choice
paste a paper of choice from the kit - I used paper5
selection invert delete
select none delete the original
add noise with settings of choice
paste a paper of choice from the kit - I used paper13
selection invert delete
select none delete the original
Apply Xero Radiance with settings of choice
Xero Radiance with settings of choice
I used the following:
Wordart
Radio
Guitar 2
Music Notes
Skull
Cupcake 2
Merge your layers
Add the Copyright and your License Number for the tube
Resize to your liking and save as PNG
This tutorial was created on November 4, 2012 by Rhonda
Any resemblance to another Tag or Tutorial is purely coincidental
Saturday, November 10, 2012
Wild About You - PTU

Supplies Needed:
Tube of choice: Im using the wonderful art work of SkyScraps Pin-Up
You can purchase this tube at SATC HERE
PTU Scrap Kit by Nicky from Inzpired Creationz called "Wild About You"
You an purchase this awesome kit from SATC HERE
Template 185 by Tamie from Addictive Pleasures
You can get this HERE
Don't forget to leave a thank you when downloading
Plugins Used:
Xero Radiance
Open template - Shift D to duplicate then close out original
Resize template 90% all layers
Canvas size 700x675
Delete copyright
paste a paper of choice from the kit - I used paper7
selection invert delete
select none delete the original
paste a paper of choice from the kit - I used paper14
selection invert delete
select none delete the original
paste a paper of choice from the kit - I used paper10
selection invert delete
select none delete the original
paste a paper of choice from the kit - I used paper2
selection invert delete
select none delete the original
paste a paper of choice from the kit - I used paper11
selection invert delete
select none delete the original
paste a paper of choice from the kit - I used paper5
selection invert delete
select none delete the original
paste a paper of choice from the kit - I used paper13
selection invert delete
select none delete the original
paste a paper of choice from the kit - I used paper12
selection invert delete
select none delete the original
paste a paper of choice from the kit - I used paper14
selection invert delete
select none delete the original
paste a paper of choice from the kit - I used paper12
selection invert delete
select none delete the original
add close up of tube you are using
selection invert delete
select none delete the original
Apply Xero Radiance with settings of choice
paste a paper of choice from the kit - I used paper2
selection invert delete
select none delete the original
add noise with settings of choice
Xero Radiance with settings of choice
I used the following:
Butterfly 1
Clutch 2
Cocktail 2
Cupcake 1,2&3
Frame 1&2
Ribbon 1
Puppy
Shoe 3
Sparkle 2
Wordart 1
Add the Copyright and your License Number for the tube
Resize to your liking and save as PNG
This tutorial was created on November 10,2012 by Rhonda
Any resemblance to another Tag or Tutorial is purely coincidental
Thursday, November 8, 2012
Pilgrim Harvest - FTU

Supplies Needed:
Tube of choice: Im using the wonderful art work of Keith Garvey
You can purchase his tubes at his own store HERE
FTU kit by Jen from Sweet Temptations called "Harvest Special" HERE
Mask of choice
Please leave some love when you download..A little thanks goes a long way
Just place your elements where you want them
Open blank canvas 700x700
Place your main tube where you want it to be on tag
Add elements around the tube
Here are the ones I used:
Branch
Crow 1
Gazebo
Harvest
Owl
Pumpkins
Scarecrow
Squirrel
Turkey
Add the Copyright and your License Number for the tube
Resize to your liking and save as PNG
This tutorial was created on November 8,2012 by Rhonda
Any resemblance to another Tag or Tutorial is purely coincidental
Wednesday, November 7, 2012
No Drama Haterz - FTU

Supplies Needed:
Tube of choice: Im using the wonderful art work of Keith Garvey
You can purchase his tubes at Garv - Girls PSP HERE
FTU Scrap Kit by Crystal from Crystals Creations called "No Drama Haterz"
You an download this kit HERE
Template #71 from Tracy HERE
Mask by Rosesblack HERE
Don't forget to leave a thank you when downloading
Plugins Used:
Xero Radiance
Open template - Shift D to duplicate then close out original
Canvas size 700x675
Delete copyright
apply close-up of tube you are using
selection invert delete
select none delete the original
paste a paper of choice from the kit - I used paper1
selection invert delete
select none delete the original
paste a paper of choice from the kit - I used paper2
selection invert delete
select none delete the original
paste a paper of choice from the kit - I used paper12
selection invert delete
select none delete the original
paste a paper of choice from the kit - I used paper9
selection invert delete
select none delete the original
apply Xero radiance with settings of choice
I used the following:
Element 3
Element 7
Element 11
Element 15
Element 16
Element 17
Element 18
Element 21
Element 24
Element 37
Open paper 5 and apply mask
Add the Copyright and your License Number for the tube
Resize to your liking and save as PNG
This tutorial was created on November 7,2012 by Rhonda
Any resemblance to another Tag or Tutorial is purely coincidental
Tuesday, November 6, 2012
Dirty Garv Dancer - FTU

Supplies Needed:
Tube of choice: Im using the wonderful art work of Keith Garvey
Which you must obtain a license to use at his store HERE
This tube was bought at PTE which has now closed
FTU Cluster frame by Stayyseee HERE
FTU kit by Tamie called Guitar Star HERE
Mask of choice
Please leave some love when you download ..A little thanks goes a long way
Xero Fritillary
Eyecandy 4 Gradient Glow
Open cluster frame - shift D and close original
canvas size 700x675
resize frame 110%
grab the freehand tool and go around the frame
open paper 6 from kit - selections invert delete
Apply Xero Radiance with settings of choice
I used the following:
Butterflies
Charm 2
Collar 2
Heart
Music Notes 2 - add a gradient glow with EC
Skull 2
Sparkles 3
Open paper 4 from kit and place as a new layer
Open mask and apply to tag
Add the Copyright and your License Number for the tube
Resize to your liking and save as PNG
This tutorial was created on November 6,2012 by Rhonda
Any resemblance to another Tag or Tutorial is purely coincidental
Winter Wonderland - PTU

Supplies Needed:
Tube of choice: Im using the wonderful art work of Ismael Rac
You can purchase his tubes at his store HERE
PTU Scrap Kit by Jen from Sweets Temptations called "Frosty"
You an purchase this awesome kit HERE
Template by Vix HERE
Don't forget to leave a thank you when downloading
Plugins Used:
Xero Radiance
Open template - Shift D to duplicate then close out original
Canvas size 700x675
I deleted copyright, frames, darker rectangle & diamonds
paste a paper of choice from the kit - I used paper8
selection invert delete
select none delete the original
Leave wordart as is
paste a paper of choice from the kit - I used paper2
selection invert delete
select none delete the original
Add frame one to rectangle
paste a paper of choice from the kit - I used paper6
selection invert delete
select none delete the original
Add frame 2
paste a paper of choice from the kit - I used paper5
selection invert delete
select none delete the original
Add frame 2 again
Apply Xero radiance with settings of choice
I used the following:
Flower 3
Skater Light
Snow
Snowflake 2
Snowman Light
Tree Light
Add the Copyright and your License Number for the tube
Resize to your liking and save as PNG
This tutorial was created on November 6,2012 by Rhonda
Any resemblance to another Tag or Tutorial is purely coincidental
Monday, November 5, 2012
Purple Gothique - PTU

Supplies Needed:
Tube of choice: Im using the wonderful art work of Arthur Crowe
Which you must obtain a license to use at his store HERE
PTU Scrap Kit by Aurelie from Pink Candy Design called "Star Gothique"
You an purchase this awesome kit HERE
Template #315 by Missy from Divine Intentionz
You can get this HERE
Don't forget to leave a thank you when downloading
Plugins Used:
Xero Radiance
Open template - Shift D to duplicate then close out original
Canvas size 705x675
delete copyright & all text layers
paste a paper of choice from the kit - I used paper4
selection invert delete
select none delete the original
paste a paper of choice from the kit - I used paper8
selection invert delete
select none delete the original
paste a paper of choice from the kit - I used paper1
selection invert delete
select none delete the original
paste a paper of choice from the kit - I used paper5
selection invert delete
select none delete the original
paste a paper of choice from the kit - I used paper3
selection invert delete
select none delete the original
paste a paper of choice from the kit - I used paper13
selection invert delete
select none delete the original
Add Xero radinace with settings of choice
Xero Radiance with settings of choice
I used the following:
Bow 2
Butterfly 1&2
Button 1&2
Cat&Skull
Cupcake 2&3
Fluffy Heart
Frame 2
Glass
Add the Copyright and your License Number for the tube
Resize to your liking and save as PNG
This tutorial was created on November 5, 2012 by Rhonda
Any resemblance to another Tag or Tutorial is purely coincidental
Saturday, November 3, 2012
Rockin Diva - PTU

Supplies Needed:
Tube of choice: Im using the wonderful art work of Ismael Rac
Which you must obtain a license to use at his store HERE
Scrap Kit By Nicky from Inzpired Creationz called "Rocker Gurl"
You an purchase this awesome kit HERE
Cluster frame by Christene at Pspers Delite
You can download this beauty HERE
Don't forget to leave a thank you when downloading
Plugins Used:
Xero Radiance
Photo Effex Scanlines
Open cluster - Shift D to duplicate then close out original
Canvas 700x670
delete copyright
paste a paper of choice from the kit - I used paper18
selection invert delete
select none
I used paper13
Add closeup of tube in the small frame
apply Xero Radiance with settings of choice
Apply PhotoEffex Scanlines with settings of choice
Xero Radiance with settings of choice
I used the following:
Clouds
Cocktail
Cupcake 5
Perfume
Pillows
Add the Copyright and your License Number for the tube
Resize to your liking and save as PNG
This tutorial was created on November 3,2012 by Rhonda
Any resemblance to another Tag or Tutorial is purely coincidental
Friday, November 2, 2012
Waiting for my Prince - PTU

Supplies Needed:
Tube of choice: Im using the wonderful art work Carolina Seabra
This is an exclusive tube ONLY available at The Creative Chick forum
You can find this tube HERE
You can view her work HERE
PTU Scrap Kit by Nicky from Inzpired Creationz called "Fairy Dust"
You an purchase this awesome kit from SATC HERE
Template #14 by Yvette who has closed her site
You can get this HERE
Don't forget to leave a thank you when downloading
Plugins Used:
Xero Radiance
Open template - Shift D to duplicate then close out original
Resize template 110% all layers
Canvas size 700x670
Delete copyright
paste a paper of choice from the kit - I used paper9
selection invert delete
select none delete the original
paste a paper of choice from the kit - I used paper3
selection invert delete
select none delete the original
paste a paper of choice from the kit - I used paper5
selection invert delete
select none delete the original
paste a paper of choice from the kit - I used paper1
selection invert delete
select none delete the original
Add a border of 3 then add noise
Xero radiance with settings of choice
I used the following:
Butterfly 1&3
Carriage
Clouds 1&2
Cupcake
Grass 2&3
Jarof Stars
Lamp post 2
Moon
Add the Copyright and your License Number for the tube
Resize to your liking and save as PNG
This tutorial was created on October 22,2012 by Rhonda
Any resemblance to another Tag or Tutorial is purely coincidental
Pink Kitty - PTU

Supplies Needed:
Tube of choice: Im using the wonderful art work of Ismael Rac
You can purchase racs tubes at his own store HERE
PTU Scrap Kit by Nicky from Inzpired Creationz called "Pink Kitty"
You an purchase this awesome kit from SATC HERE
Top template by Janice from JEK Creations
You can get this HERE
Don't forget to leave a thank you when downloading
Plugins Used:
Xero Radiance
Open template - Shift D to duplicate then close out original
Resize template 93%
Canvas size 700x670
Delete copyright
I added noise to all my frames
paste a paper of choice from the kit - I used paper7
selection invert delete
select none delete the original
paste a paper of choice from the kit - I used paper9
selection invert delete
select none delete the original
paste a paper of choice from the kit - I used paper5
selection invert delete
select none delete the original
paste a paper of choice from the kit - I used paper6
selection invert delete
select none delete the original
add a new layer and flood fill with black
add weave effect
select none delete the original
apply Xero Radiance with settings of choice
Xero radiance with settings of choice
I used the following:
Backpack
Bow 2
Collar
Halftone 1&2
Heart 2&3
Kitty 2
Kitty Skull 2
Add the Copyright and your License Number for the tube
Resize to your liking and save as PNG
This tutorial was created on October 22,2012 by Rhonda
Any resemblance to another Tag or Tutorial is purely coincidental
Subscribe to:
Posts (Atom)
My Blinkie

My Licenses

