Tuesday, July 31, 2012
No Drama FTU

This tutorial is written for those with knowledge of PSP
Supplies Needed:
Tube of choice: Im using the wonderful art work of Lady Mischa
This tube is an exclusive and can be found at SATC HERE
FTU Scrap Kit By Kristin from called "No More Drama"
You an find this awesome kit HERE
Mask #57 from Rosesblack - While you are there download more of her great masks
You an find this mask HERE
Please leave some love when you download this freebies..A little thanks goes a long way
Plugins Used:
Xero Radiance
Ok Lets get Started:
Open a blank image 700x700
Open frame 3 from kit and place as a new image
grab the magik wand and click inside frame
Select modify expand by 5
Open a blank image 700x700
Open frame 3 from kit and place as a new image
grab the magik wand and click inside frame
Select modify expand by 5
Open paper 3 from kit and place as a new layer
selections invert - delete
selections invert - delete
Open splatter element and place behind frame
You will have some hanging out of frame but leave it as is
You will have some hanging out of frame but leave it as is
Place your main tube to left of frame
Apply Xero Radiance with settings of choice
Apply Xero Radiance with settings of choice
Open cupcake element from kit
Resize 55% and place behind tube layer to the right of frame
Resize 55% and place behind tube layer to the right of frame
Open bomb element and resize 48%
Place to the right of frame - in front of cupcake
Open flower 4 and resize 68%
Place to the top left of frame behind tube
Place to the top left of frame behind tube
Open the logo element and resize 60%
Place to the left behind tube with some of element showing
Place to the left behind tube with some of element showing
Open key element and reise 40%
Place between cupcake and bomb
Use the deform tool and rotate to the right slightly
Place between cupcake and bomb
Use the deform tool and rotate to the right slightly
Dropshadow all layers - close off the white background
merge layers visible
merge layers visible
Open paper 16 from kit and place as a new layer
Open mask and apply to tag
Open paper 17 and place as a new layer
Apply same mask to tag
Place your name where you like it
Add the Copyright and your License Number for the tube
Resize to your liking and save as PNG
This tutorial was created on July 14,2012 by Rhonda
Any resemblance to another Tag or Tutorial is purely coincidental
Add the Copyright and your License Number for the tube
Resize to your liking and save as PNG
This tutorial was created on July 14,2012 by Rhonda
Any resemblance to another Tag or Tutorial is purely coincidental

Can't Imitate PTU

Supplies Needed:
Tube of choice: Im using the wonderful art work of Zlata_M
Which you must obtain a license to use at Pics for Design HERE
Scrap Kit By Aurelie from Pink Candy Designs called "Michelle"
You an purchase this awesome kit HERE
Template #17 by Kandi from Kandi Kissez
You can get this HERE
Don't forget to leave a thank you when downloading
Plugins Used:
Xero Radiance
Ok Lets get Started:
Open template - Shift D to duplicate then close out original
Canvas size 710x675
I deleted copyright
paste a paper of choice from the kit - I used paper17
selection invert delete
selections invert
selections modify expand by 3
drop down a layer - open paper3 and add as new layer
add noise with settings of choice
select none delete the original
paste a paper of choice from the kit - I used paper15
selection invert delete
selections invert
selections modify expand by 3
drop down a layer - open paper2 and add as new layer
add noise with settings of choice
select none delete the original
paste a paper of choice from the kit - I used paper18
selection invert delete
select none delete the original
add close up tube and fit in rectangle
selection invert delete
select none delete the original
Apply Xero Radiance with settings of choice
add noise with settings of choice
paste a paper of choice from the kit - I used paper4
selection invert delete
select none delete the original
paste a paper of choice from the kit - I used paper2
selection invert delete
select none delete the original
paste a paper of choice from the kit - I used paper18
selection invert delete
select none delete the original
add close up tube and fit in rectangle
selection invert delete
select none delete the original
Apply Xero Radiance with settings of choice
add noise with settings of choice
paste a paper of choice from the kit - I used paper14
selection invert delete
select none delete the original
add noise with settings of choice
paste a paper of choice from the kit - I used paper3
selection invert delete
select none delete the original
Xero Radiance with settings of choice
I used the following:
Bottlecap
Bow
Candle
Flower
Heart
Lollipop
Add the Copyright and your License Number for the tube
Resize to your liking and save as PNG
This tutorial was created on July 31, 2012 by Rhonda
Any resemblance to another Tag or Tutorial is purely coincidental
Saturday, July 28, 2012
Purple Desires PTU

This tutorial is written for those with knowledge of PSP
Supplies Needed:
Tube of choice: I'm using the wonderful art work of Alex Prihodko
Which you must obtain a license to use at Pics for Design HERE
Scrap Kit By Aurelie from Pink Candy Designs called "Rainbow Girl"
You an purchase this awesome kit HERE
Template #168 by Kristin from Toxic Dezires
You can get this HERE
Don't forget to leave a thank you when downloading
Plugins Used:
Xero Radiance
Photo Effex Scanlines
Ok Lets get Started:
Open template - Shift D to duplicate then close out original
Image resize 90% all layers
Canvas 700x650
I deleted copyright & right square
Open template - Shift D to duplicate then close out original
Image resize 90% all layers
Canvas 700x650
I deleted copyright & right square
Click on left square selections,select all, float,defloat
paste a paper of choice from the kit - I used paper5
selection invert delete
select none delete the original
paste a paper of choice from the kit - I used paper5
selection invert delete
select none delete the original
Click on pink top rectangle selections,select all, float,defloat
paste a paper of choice from the kit - I used paper11
selection invert delete
select none delete the original
paste a paper of choice from the kit - I used paper11
selection invert delete
select none delete the original
Click on pink bottom rectangle selections,select all, float,defloat
paste a paper of choice from the kit - I used paper2
selection invert delete
select none delete the original
paste a paper of choice from the kit - I used paper2
selection invert delete
select none delete the original
Click on blue top rectangle back selections,select all, float,defloat
paste a paper of choice from the kit - I used paper8
selection invert delete
select none delete the original
paste a paper of choice from the kit - I used paper8
selection invert delete
select none delete the original
Click on blue bottom rectangle selections,select all, float,defloat
paste a paper of choice from the kit - I used paper1
selection invert delete
select none delete the original
paste a paper of choice from the kit - I used paper1
selection invert delete
select none delete the original
Click on rounded rectangle selections,select all, float,defloat
paste a paper of choice from the kit - I used paper9
selection invert delete
select none delete the original
paste a paper of choice from the kit - I used paper9
selection invert delete
select none delete the original
Click on circle selections,select all, float,defloat
paste a paper of choice from the kit - I used paper1
selection invert delete
select none delete the original
paste a paper of choice from the kit - I used paper1
selection invert delete
select none delete the original
Open frame from kit and place above the circle layer
Add close up of tube
Apply Xero Radiance with settings of choice
Apply Photo Effex with default settings
Add close up of tube
Apply Xero Radiance with settings of choice
Apply Photo Effex with default settings
Place your main tube
Xero Radiance with settings of choice
Xero Radiance with settings of choice
Now add any other elements of choice
I used the following:
Bag
Bottlecap
Bunny
Butterfly
Candle
Candy
Cupcake
Glitter
Martini
Tag
I used the following:
Bag
Bottlecap
Bunny
Butterfly
Candle
Candy
Cupcake
Glitter
Martini
Tag
Merge your layers
Place your name where you like it
Add the Copyright and your License Number for the tube
Resize to your liking and save as PNG
This tutorial was created on July 28, 2012 by Rhonda
Any resemblance to another Tag or Tutorial is purely coincidental
Add the Copyright and your License Number for the tube
Resize to your liking and save as PNG
This tutorial was created on July 28, 2012 by Rhonda
Any resemblance to another Tag or Tutorial is purely coincidental
I Smell Jealousy

This tutorial is written for those with knowledge of PSP
Supplies Needed:
Tube of choice: Im using the wonderful art work of Very Many
You can purchase this tube at SATC HERE
Supplies Needed:
Tube of choice: Im using the wonderful art work of Very Many
You can purchase this tube at SATC HERE
PTU Scrap Kit by Nicky from Inzpired Creationz called "Ready to Fight"
You an purchase this awesome kit from SATC HERE
Template #6 by Salsa from Charmed Vixen
You can get this HERE
Don't forget to leave a thank you when downloading
You an purchase this awesome kit from SATC HERE
Template #6 by Salsa from Charmed Vixen
You can get this HERE
Don't forget to leave a thank you when downloading
Plugins Used:
Xero Radiance
Ok Lets get Started:
Open template - Shift D to duplicate then close out original
Canvas size 700x650
I deleted copyright, dotted circle & stars
Open template - Shift D to duplicate then close out original
Canvas size 700x650
I deleted copyright, dotted circle & stars
Click on back rectangle selections,select all, float,defloat
paste a paper of choice from the kit - I used paper2
selection invert delete
select none delete the original
paste a paper of choice from the kit - I used paper2
selection invert delete
select none delete the original
Click on large pink circle selections,select all, float,defloat
paste a paper of choice from the kit - I used paper5
selection invert delete
select none delete the original
paste a paper of choice from the kit - I used paper5
selection invert delete
select none delete the original
Click on large black circle selections,select all, float,defloat
paste a paper of choice from the kit - I used paper6
selection invert delete
select none delete the original
paste a paper of choice from the kit - I used paper6
selection invert delete
select none delete the original
Click on left purple circle selections,select all, float,defloat
paste a paper of choice from the kit - I used paper12
selection invert delete
Add noise with setting of choice
select none delete the original
paste a paper of choice from the kit - I used paper12
selection invert delete
Add noise with setting of choice
select none delete the original
Repeat same above instructions for right purple layer
Click on right black square selections,select all, float,defloat
add a close up of the tube you are using
selections invert delete
select none delete the original
Apply Xero Radiance with settings of choice
add a close up of the tube you are using
selections invert delete
select none delete the original
Apply Xero Radiance with settings of choice
Repeat same above instructions for left black square
Click on small pink circle selections,select all, float,defloat
paste a paper of choice from the kit - I used paper8
selection invert delete
select none delete the original
paste a paper of choice from the kit - I used paper8
selection invert delete
select none delete the original
Click on center black rectangle selections,select all, float,defloat
paste a paper of choice from the kit - I used paper15
selection invert delete
select none delete the original
paste a paper of choice from the kit - I used paper15
selection invert delete
select none delete the original
Click on wordart MMMISMELL selections,select all, float,defloat
Make a gradient using 2 colors of choice
Add a new layer and flood fill with gradient
selection invert delete
select none delete the original
I left the other layers as they are
Make a gradient using 2 colors of choice
Add a new layer and flood fill with gradient
selection invert delete
select none delete the original
I left the other layers as they are
Place your main tube in the center
Xero radiance with settings of choice
I moved the word art down below my tube
Xero radiance with settings of choice
I moved the word art down below my tube
Now add any other elements of choice
I used the following:
Bomb
Bow 2
Cupcake 2
Handprint
Heart 2 & 3
Perfume
Shoe 1
Skull 4
Sparkles
Splatter 2,3,& 4
I used the following:
Bomb
Bow 2
Cupcake 2
Handprint
Heart 2 & 3
Perfume
Shoe 1
Skull 4
Sparkles
Splatter 2,3,& 4
Merge your layers
Place your name where you like it
Add the Copyright and your License Number for the tube
Resize to your liking and save as PNG
This tutorial was created on July 28, 2012 by Rhonda
Any resemblance to another Tag or Tutorial is purely coincidental
Add the Copyright and your License Number for the tube
Resize to your liking and save as PNG
This tutorial was created on July 28, 2012 by Rhonda
Any resemblance to another Tag or Tutorial is purely coincidental
Tuesday, July 17, 2012
PTU - Hot Stuff

This tutorial is written for those with knowledge of PSP
Supplies Needed:
Tube of choice: Im using the wonderful art work of Lorenzo DiMauro
You must obtain a license to use his awesome creations at PTE HERE
Scrap Kit By Aurelie from Pink Candy Designs called "Skullz Goth"
You an purchase this awesome kit HERE
Template #130 from Rose's Place
You can get this HERE
Texture found HERE
Mask #19 from Moonbeams and Spiderwebs
You can get this HERE
Don't forget to leave a thank you when downloading
Plugins Used:
Xero Radiance
Xero Fritillary
Ok Lets get Started:
Open template - Shift D to duplicate then close out original
Canvas 700x662
Delete copyright layer,raster 8,copy of raster 8 & raster 3
Open template - Shift D to duplicate then close out original
Canvas 700x662
Delete copyright layer,raster 8,copy of raster 8 & raster 3
Click on raster 7 selections,select all, float,defloat
paste a paper of choice from the kit - I used paper 6
selection invert delete
select none delete the original
paste a paper of choice from the kit - I used paper 6
selection invert delete
select none delete the original
Click on raster 5 selections,select all, float,defloat
paste a paper of choice from the kit - I used paper 10
selection invert delete
select none delete the original
paste a paper of choice from the kit - I used paper 10
selection invert delete
select none delete the original
Click on raster 6 selections,select all, float,defloat
paste a paper of choice from the kit - I used paper 2
selection invert delete
select none delete the original
paste a paper of choice from the kit - I used paper 2
selection invert delete
select none delete the original
Repeat above for copy of raster 6
Click on copy 2 of raster 3 selections,select all, float,defloat
paste a paper of choice from the kit - I used paper 13
selection invert delete
select none delete the original
paste a paper of choice from the kit - I used paper 13
selection invert delete
select none delete the original
Repeat above instructions for copy 3 of raster 3
Click on raster 4 selections,select all, float,defloat
paste a paper of choice from the kit - I used paper 1
selection invert delete
select none delete the original
paste a paper of choice from the kit - I used paper 1
selection invert delete
select none delete the original
Repeat above for copy of raster 4
Click on raster 1 selections,select all, float,defloat
paste your texture and colorize to match your tube
selection invert delete
Add Xero Fritillary with settings of choice
select none delete the original
paste your texture and colorize to match your tube
selection invert delete
Add Xero Fritillary with settings of choice
select none delete the original
Add noise to raster 2 with settings of choice
Click on raster 9 selections,select all, float,defloat
pick 2 colors and make a gradient
add new layer and flood fill the wordart
add effects texture with settings of choice
select none delete the original
pick 2 colors and make a gradient
add new layer and flood fill the wordart
add effects texture with settings of choice
select none delete the original
Merge the wordart and place where you choose
Place your main tube
Add Xero Radiance with settings of choice
Now time to add our elements
I used the following:
Beads
Beads2
Bow
Candy
Candle
Cupcake 3
Glitter
Kitten
Martini
Sparkles
Star
Wire
I used the following:
Beads
Beads2
Bow
Candy
Candle
Cupcake 3
Glitter
Kitten
Martini
Sparkles
Star
Wire
Paste paper 14 as a new layer and add mask
Merge your layers
Place your name where you like it
Add the Copyright and your License Number for the tube
Resize to your liking and save as PNG
This tutorial was created on July 17, 2012 by Rhonda
Any resemblance to another Tag or Tutorial is purely coincidental
Add the Copyright and your License Number for the tube
Resize to your liking and save as PNG
This tutorial was created on July 17, 2012 by Rhonda
Any resemblance to another Tag or Tutorial is purely coincidental
Friday, July 13, 2012
PTU - Old School

This tutorial is written for those with knowledge of PSP
Supplies Needed:
Tube of choice: Im using the wonderful art work of Keith Garvey
I bought this tube at MPT which is now closed
You can find Garvey's tube at PTE HERE
Scrap Kit By Aurelie from Pink Candy Designs called "Tracey"
You an purchase this awesome kit HERE
Template #136 from Amy & Leah
You can get this HERE
Don't forget to leave a thank you when downloading
Plugins Used:
Xero Radiance
Ok Lets get Started:
Open template - Shift D to duplicate then close out original
Resize template 120% with all layers checked
Canvas 700x620
Delete copyright layer
Open template - Shift D to duplicate then close out original
Resize template 120% with all layers checked
Canvas 700x620
Delete copyright layer
Click on raster 9 selections,select all, float,defloat
paste a paper of choice from the kit - I used paper7
selection invert delete
select none delete the original
paste a paper of choice from the kit - I used paper7
selection invert delete
select none delete the original
Click on raster 7&8 selections,select all, float,defloat
paste a paper of choice from the kit - I used paper4
selection invert delete
select none delete the original
paste a paper of choice from the kit - I used paper4
selection invert delete
select none delete the original
Click on raster 6 selections,select all, float,defloat
paste a paper of choice from the kit - I used paper 5
selection invert delete
select none delete the original
paste a paper of choice from the kit - I used paper 5
selection invert delete
select none delete the original
Click on raster 5 selections,select all, float,defloat
paste a paper of choice from the kit - I used paper3
selection invert delete
select none delete the original
paste a paper of choice from the kit - I used paper3
selection invert delete
select none delete the original
Add noise to raster 4&1 with settings of choice
Click on raster 3 selections,select all, float,defloat
paste a paper of choice from the kit - I used paper10
selection invert delete
select none delete the original
paste a paper of choice from the kit - I used paper10
selection invert delete
select none delete the original
Click on raster 2 selections,select all, float,defloat
paste a paper of choice from the kit - I used paper1
selection invert delete
select none delete the original
paste a paper of choice from the kit - I used paper1
selection invert delete
select none delete the original
Add parts of the tube you are using into raster 2
Apply Xero Radiance with settings of choice
Apply Xero Radiance with settings of choice
Place your main tube
Add Xero Radiance again
Add Xero Radiance again
Now time to add our elements
I used the following:
Bag
Bear
Bottle
Broken Heart
Candy
Cupcake
Fuzzy Heart
Glitter
Netting
Sparkles
Star 2
Stars
Wire
I used the following:
Bag
Bear
Bottle
Broken Heart
Candy
Cupcake
Fuzzy Heart
Glitter
Netting
Sparkles
Star 2
Stars
Wire
Merge your layers
Place your name where you like it
Add the Copyright and your License Number for the tube
Resize to your liking and save as PNG
This tutorial was created on July 13, 2012 by Rhonda
Any resemblance to another Tag or Tutorial is purely coincidental
Add the Copyright and your License Number for the tube
Resize to your liking and save as PNG
This tutorial was created on July 13, 2012 by Rhonda
Any resemblance to another Tag or Tutorial is purely coincidental
Sunday, July 8, 2012
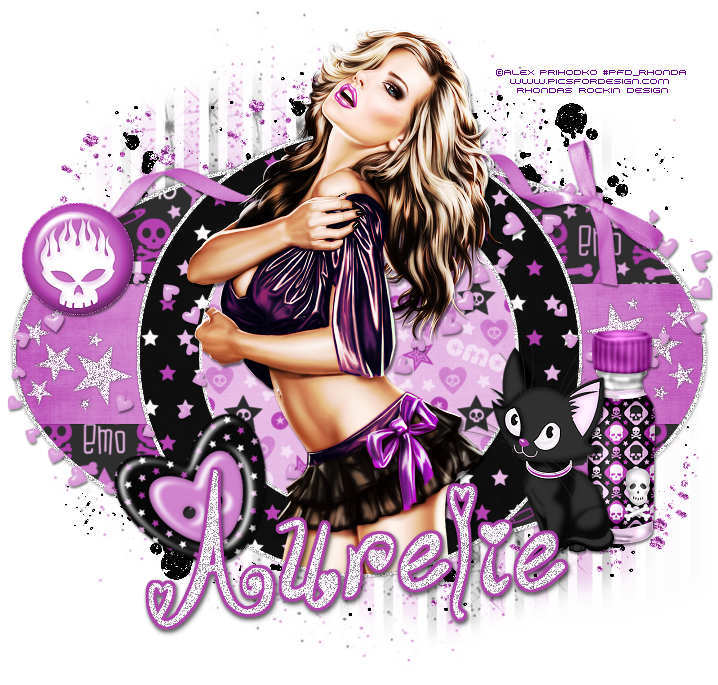
PTU - Totally Emo
This tutorial is written for those with knowledge of PSP
Supplies Needed:
Tube of choice: Im using the wonderful art work of Alex Prihodko
Which you must obtain a license to use at Pics for Design HERE
Scrap Kit By Aurelie from Pink Candy Designs called "Totally Emo"
You an purchase this awesome kit HERE
Template #84 by Rose from Rose's Place
You can get this HERE
Mask #66 from Rosesblack
You can get this HERE
Don't forget to leave a thank you when downloading
Plugins Used:
Xero Radiance
Ok Lets get Started:
Open template - Shift D to duplicate then close out original
Canvas 718x685
I deleted copyright,wordart & raster 2
Open template - Shift D to duplicate then close out original
Canvas 718x685
I deleted copyright,wordart & raster 2
Click on raster 8 selections,select all, float,defloat
paste a paper of choice from the kit - I used paper11
selection invert delete
select none delete the original
paste a paper of choice from the kit - I used paper11
selection invert delete
select none delete the original
Click on raster 10 selections,select all, float,defloat
paste a paper of choice from the kit - I used paper8
selection invert delete
select none delete the original
paste a paper of choice from the kit - I used paper8
selection invert delete
select none delete the original
Repeat same above instructions for copy of raster 10 layer
Click on raster 9 selections,select all, float,defloat
paste a paper of choice from the kit - I used paper2
selection invert delete
select none delete the original
paste a paper of choice from the kit - I used paper2
selection invert delete
select none delete the original
Click on raster 5 back selections,select all, float,defloat
paste a paper of choice from the kit - I used paper3
selection invert delete
Add noise with setting of choice
select none delete the original
paste a paper of choice from the kit - I used paper3
selection invert delete
Add noise with setting of choice
select none delete the original
Repeat same above instructions for copy of raster 5 layer
Click on raster 3 back selections,select all, float,defloat
paste a paper of choice from the kit - I used paper6
selection invert delete
selections modify expand by 3
drop down a layer, add new layer and flood fill with white
repeat noise settings
select none delete the original
paste a paper of choice from the kit - I used paper6
selection invert delete
selections modify expand by 3
drop down a layer, add new layer and flood fill with white
repeat noise settings
select none delete the original
Click on raster 6 - increase settings to 100
selections,select all, float,defloat
paste a paper of choice from the kit - I used paper12
selection invert delete
select none delete the original
selections,select all, float,defloat
paste a paper of choice from the kit - I used paper12
selection invert delete
select none delete the original
Place your main tube
Xero radiance with settings of choice
Xero radiance with settings of choice
Now add any other elements of choice
I used the following:
Bead
Bottle
Button
Cat
Ribbon
Scattered hearts
Splats
I used the following:
Bead
Bottle
Button
Cat
Ribbon
Scattered hearts
Splats
Merge your layers & add mask
Place your name where you like it
Add the Copyright and your License Number for the tube
Resize to your liking and save as PNG
This tutorial was created on July 7, 2012 by Rhonda
Any resemblance to another Tag or Tutorial is purely coincidental
Add the Copyright and your License Number for the tube
Resize to your liking and save as PNG
This tutorial was created on July 7, 2012 by Rhonda
Any resemblance to another Tag or Tutorial is purely coincidental
Saturday, July 7, 2012
PTU - Punk Rebel

This tutorial is written for those with knowledge of PSP
Supplies Needed:
Tube of choice: Im using the wonderful art work of Celina Art
Which you must obtain a license to use at Scraps and the City HERE
The tube i am using was a prepaid exclusive
Scrap Kit By Nicky from Inzpired Creationz called "Pink Kitty"
You an purchase this awesome kit HERE
Template #367 by Missy from Divine Intentionz
You can get this HERE
Don't forget to leave a thank you when downloading
Plugins Used:
Xero Radiance
Xero Porcelin
Photo Effex Scanlines
Ok Lets get Started:
Open template - Shift D to duplicate then close out original
Canvas 736x675
delete copyright
Open template - Shift D to duplicate then close out original
Canvas 736x675
delete copyright
Click on rectangle1 selections,select all, float,defloat
paste a paper of choice from the kit - I used paper10
selection invert delete
select none delete the original
paste a paper of choice from the kit - I used paper10
selection invert delete
select none delete the original
Click on circle1 selections,select all, float,defloat
paste a paper of choice from the kit - I used paper6
selection invert delete
select none delete the original
paste a paper of choice from the kit - I used paper6
selection invert delete
select none delete the original
Click on circle2 selections,select all, float,defloat
paste a paper of choice from the kit - I used paper 7
selection invert delete
select none delete the original
paste a paper of choice from the kit - I used paper 7
selection invert delete
select none delete the original
Add noise to the filmstrip layer
Click on circle3 selections,select all, float,defloat
paste a paper of choice from the kit - I used paper9
selection invert delete
select none delete the original
paste a paper of choice from the kit - I used paper9
selection invert delete
select none delete the original
I left the other layers as they were
Add close up tube to rectangle and filmstrip layers
Add Xero Radiance with settings of choice to tubes
Change blend mode to Luminance(L) on rectangle layer
Apply Photo Effex Scanlines with default settings
Place your main tube
Xero Radiance with settings of choice
Xero Porcelin with settings of choice
Xero Radiance with settings of choice
Xero Porcelin with settings of choice
Now time to add our elements
I used the following:
Backpack
Halftone 2
Kandy 2
Kupcake 3
Lolli 4
Sparkles 1&2
Star 4
I used the following:
Backpack
Halftone 2
Kandy 2
Kupcake 3
Lolli 4
Sparkles 1&2
Star 4
Merge your layers
Place your name where you like it
Add the Copyright and your License Number for the tube
Resize to your liking and save as PNG
This tutorial was created on July 7, 2012 by Rhonda
Any resemblance to another Tag or Tutorial is purely coincidental
Add the Copyright and your License Number for the tube
Resize to your liking and save as PNG
This tutorial was created on July 7, 2012 by Rhonda
Any resemblance to another Tag or Tutorial is purely coincidental
Monday, July 2, 2012
PTU - Pink Rebel

This tutorial is written for those with knowledge of PSP
Supplies Needed:
Tube of choice: Im using the wonderful art work of Arthur Crowe
Which you must obtain a license to use at Arthur Crowe's Factory HERE
Scrap Kit By Aurelie from Pink Candy Designs called "Pink Rebel"
You an purchase this awesome kit HERE
Template #332 by Missy from Divine Intentionz
You can get this HERE
Don't forget to leave a thank you when downloading
Plugins Used:
Xero Radiance
Photo Effex Scanlines
Ok Lets get Started:
Open template - Shift D to duplicate then close out original
Canvas 720x680
I deleted copyright,word art & top dotted lines
Open template - Shift D to duplicate then close out original
Canvas 720x680
I deleted copyright,word art & top dotted lines
Click on rectangle right selections,select all, float,defloat
paste a paper of choice from the kit - I used paper11
selection invert delete
select none delete the original
paste a paper of choice from the kit - I used paper11
selection invert delete
select none delete the original
Click on rectangle left selections,select all, float,defloat
paste a paper of choice from the kit - I used paper11
selection invert delete
select none delete the original
paste a paper of choice from the kit - I used paper11
selection invert delete
select none delete the original
Leave glittered rectangle right and left layers as is
leave dotted lines and stars as is
leave dotted lines and stars as is
Click on circle left & right selections,select all, float,defloat
paste a paper of choice from the kit - I used paper 13
selection invert delete
select none delete the original
paste a paper of choice from the kit - I used paper 13
selection invert delete
select none delete the original
Click on glittered circle right & left selections,select all, float,defloat
paste a paper of choice from the kit - I used paper7
selection invert delete
select none delete the original
paste a paper of choice from the kit - I used paper7
selection invert delete
select none delete the original
Click on circle 1 selections,select all, float,defloat
paste a paper of choice from the kit - I used paper3
selection invert delete
select none delete the original
paste a paper of choice from the kit - I used paper3
selection invert delete
select none delete the original
Leave glittered circle center as is
Click on circle 2 selections,select all, float,defloat
paste a paper of choice from the kit - I used paper12
selection invert delete
select none delete the original
paste a paper of choice from the kit - I used paper12
selection invert delete
select none delete the original
Click on glittered circle center & glittered rectangle center
Choose 2 colors and make a gradient
Add new layer and flood fill
Add noise 50% with uniform and monochrome checked
Choose 2 colors and make a gradient
Add new layer and flood fill
Add noise 50% with uniform and monochrome checked
Click on circle 3 selections,select all, float,defloat
paste a paper of choice from the kit - I used paper5
selection invert delete
select none delete the original
paste a paper of choice from the kit - I used paper5
selection invert delete
select none delete the original
Click on rectangle center selections,select all, float,defloat
paste a paper of choice from the kit - I used paper1
selection invert delete
select none delete the original
paste a paper of choice from the kit - I used paper1
selection invert delete
select none delete the original
Click on rectangle center 2 selections,select all, float,defloat
paste a paper of choice from the kit - I used paper2
selection invert delete
select none delete the original
paste a paper of choice from the kit - I used paper2
selection invert delete
select none delete the original
Click on the frame backgrounds
Add new layer and flood fill with grey
Add close up of tube
Xero Radiance with settings of choice
Change blend mode to Luminance(L)
Apply Photo Effex Scanlines with default settings
Add new layer and flood fill with grey
Add close up of tube
Xero Radiance with settings of choice
Change blend mode to Luminance(L)
Apply Photo Effex Scanlines with default settings
Click on the frames layers
Grab your magic wand and click inside the frames
Make sure you have marching ants around the inside
Add new layer and flood fill with the gradient you used before
Don't delete the frames because you want the white to show
Grab your magic wand and click inside the frames
Make sure you have marching ants around the inside
Add new layer and flood fill with the gradient you used before
Don't delete the frames because you want the white to show
Place your main tube
Xero radiance with settings of choice
Xero radiance with settings of choice
Now time to add our elements
I used the following:
Beads
Bear
Bow 3
Butterfly 2
Candy
Flower
Glitter
Screw
Skull 4
Skull gum
Sparkles
Star
I used the following:
Beads
Bear
Bow 3
Butterfly 2
Candy
Flower
Glitter
Screw
Skull 4
Skull gum
Sparkles
Star
Merge your layers
Place your name where you like it
Add the Copyright and your License Number for the tube
Resize to your liking and save as PNG
This tutorial was created on July 2, 2012 by Rhonda
Any resemblance to another Tag or Tutorial is purely coincidental
Add the Copyright and your License Number for the tube
Resize to your liking and save as PNG
This tutorial was created on July 2, 2012 by Rhonda
Any resemblance to another Tag or Tutorial is purely coincidental
Sunday, July 1, 2012
PTU - Do You Believe

This tutorial is written for those with knowledge of PSP
Supplies Needed:
Tube of choice: Im using the wonderful art work of The Hunter
Which you must obtain a license to use at Apocalips Studio HERE
Scrap Kit By Nicky from Inzpired Creationz called "Enchanted Dreams"
You an purchase this awesome kit HERE
Supplies Needed:
Tube of choice: Im using the wonderful art work of The Hunter
Which you must obtain a license to use at Apocalips Studio HERE
Scrap Kit By Nicky from Inzpired Creationz called "Enchanted Dreams"
You an purchase this awesome kit HERE
Thank You Nicky for allowing me to use this awesome kit!!!
Template #74 by Kandy Kisses
You can get this HERE
Don't forget to leave a thank you when downloading
Template #74 by Kandy Kisses
You can get this HERE
Don't forget to leave a thank you when downloading
Plugins Used:
Xero Radiance
Ok Lets get Started:
Open template - Shift D to duplicate then close out original
Canvas 725x675
I deleted copyright,black star cluster
Open template - Shift D to duplicate then close out original
Canvas 725x675
I deleted copyright,black star cluster
Click on box backs layer
Add noise 30% uniform and monochrome checked
Add noise 30% uniform and monochrome checked
Click on black boxes selections,select all, float,defloat
paste a paper of choice from the kit - I used paper3
selection invert delete
select none delete the original
paste a paper of choice from the kit - I used paper3
selection invert delete
select none delete the original
Click on pink star selections,select all, float,defloat
paste a paper of choice from the kit - I used paper4
selection invert delete
select none delete the original
paste a paper of choice from the kit - I used paper4
selection invert delete
select none delete the original
Click on blue star selections,select all, float,defloat
paste a paper of choice from the kit - I used paper1
selection invert delete
select none delete the original
paste a paper of choice from the kit - I used paper1
selection invert delete
select none delete the original
Click on left frame back selections,select all, float,defloat
paste a paper of choice from the kit - I used paper9
selection invert delete
select none delete the original
paste a paper of choice from the kit - I used paper9
selection invert delete
select none delete the original
Click on right frame back selections,select all, float,defloat
paste a paper of choice from the kit - I used paper6
selection invert delete
select none delete the original
paste a paper of choice from the kit - I used paper6
selection invert delete
select none delete the original
Click on left & right frames
Add noise 30% uniform and monochrome checked
Add noise 30% uniform and monochrome checked
Click on black star selections,select all, float,defloat
paste a paper of choice from the kit - I used paper4
selection invert delete
select none delete the original
paste a paper of choice from the kit - I used paper4
selection invert delete
select none delete the original
Click on word art
Add noise 30% random and monochrome checked
Add noise 30% random and monochrome checked
Open door 1 element from kit
place as a new layer and center
place as a new layer and center
Place your main tube
Xero radiance with settings of choice
Xero radiance with settings of choice
Now add any other elements of choice
I used the following:
Butterflies
Cat
Flower 3
Grass 1
Ladder
All the mushrooms
Owl
Sparkles 1
I used the following:
Butterflies
Cat
Flower 3
Grass 1
Ladder
All the mushrooms
Owl
Sparkles 1
Merge your layers
Place your name where you like it
Add the Copyright and your License Number for the tube
Resize to your liking and save as PNG
This tutorial was created on July 1, 2012 by Rhonda
Any resemblance to another Tag or Tutorial is purely coincidental
Add the Copyright and your License Number for the tube
Resize to your liking and save as PNG
This tutorial was created on July 1, 2012 by Rhonda
Any resemblance to another Tag or Tutorial is purely coincidental
Subscribe to:
Posts (Atom)
My Blinkie

My Licenses

